Pages

Monday, December 2, 2013

Kitchen dreams

I think my brother summed up the state of our kitchen best. He walked in, looked around and told me I needed to apply for kitchen crashers. That sounded about right to me. Its a HUGE kitchen but missing a few key things to make it function better. And its ugly. I don't like ugly. So here are some pictures of its current state followed by a list of my dreams and a few plans to help get us there.


Problem 1: The countertops are green and held together by masking tape.


Problem 2: the lower cabinets are flat and dated looking. Also super dirty and grimy feeling. 


Problem 3: This is the only prep space right by the stove. We have a ton of counter space but its far away from where we actually cook. 


Problem 4: What is this space? There are cabinets above it so I don't think its supposed to be an eat in. Also its kinda weird to cook with the stove dropping off on that side. Also we have no pantry. Everything is tucked in lower cabinets. And yes its lazy, but a total pain and harder to inventory what food we do and don't have. 


Problem 5: See above and below photo. Florescent lighting. bleh. 


But here's what I like. We have a ton of space. And those glass upper cabinets are beautiful! I'm also madly in love with our new chalkboard wall that we added a few weeks ago. 


I also love the porcelain sink and huge window it looks out over. This kitchen could be amazing! And hopefully one day it will be. We are going to take small baby steps to get us there, but oh do I have plans! 

Heres the List:
-Paint chalk board wall on back wall
-Add shaker style detailing to flat bottom cabinets (see this tutorial)
-Add pantry and lower cabinets to random side of stove (MLW's granddad is super handy, plan below)
-Paint uppers "Decorator's White" by BM
-Paint lowers a blue/grey slate
-Replace all hardware with ballin' brass hardware (that I already purchased when it went on sale)
-New Countertops
-Subway tile backsplash with grey grout (dark grout=less dirty looking)
-Get a new dishwasher to match stove and fridge 
-Actually install hood above stove 
-Replace lighting 
-Style all those pretty glass uppers
-Cook something yummy when its all done 

Lawd. Its a list. But hopefully with hard work, penny pinching and lots of painting we can get it done. Below I've got a couple of ideas we have started throwing around. 


So here we have a swatch of Silestone's Quartz in Lagoon. This is our dream countertop, it looks like marble, and shockingly also costs more than marble. Crazy right? I'm looking at getting a "faurble" that costs more than the real stuff! But marble is super soft, scratches and stains easy. Quartz is crazy strong, stain resistant and can basically take a beating and still look band new.  Our budget might nix this in the end but while we are still dreaming it can't hurt right? I'm open to basically any countertop as long as it has some blue/grey veining in it. 
The brass pulls are pretty sweet right? I've got smaller round knobs for all the doors. The pulls are just going on the drawers. I would also love to switch out the hinges to hidden hinges, but all signs point to them being crazy expensive and we have A LOT of doors to do.  So I think I will just switch out the current hinges to match the new hardware when we get to that step. And yes, I know brass is super taste specific, but I'm going to keep all the old stuff so if we go to resale we can put that back on for a more neutral look. But we aren't selling this house for a long long time so I'm going to live with what I love! 
This drawer has some BM "Nocturnal Grey" slapped on it and I think its a winner. MLW is leaning more towards the bottom photo which is BM "Vermont Slate." If you scroll back up you'll see we auditioned a third color "Newbury Blue" but we both decided it was way too navy. 


Here is MLW's Granddad's amazing rendering of what our pantry and beside stove area is potentially going to look like. Its crazy right! I'm so happy and honored he is willing to do this for us. Granddad's are the best.  :D


And finally here is my inspiration for the kitchen. The lower right photo was another Pinterest find. I love the white upper and darker lower combination. I also am really intrigued by mixing metals in the kitchen ie: Stainless fixtures with brass hardware and lighting. Its a huge fashion trend and I'm of the school that good design is good design whether its clothing, print, bridal, styling, or home.  

So wish us luck and dream big my blogy friends. I'll try to keep you updated as things progress. : D

Wednesday, November 27, 2013

Chalkboard Art

With Thanksgiving tomorrow I thought it might be fun to go ahead and share this. Could be a good way to have a festive menu displayed or create an "I"m thankful for" board that the whole family can contribute too.
I had always wondered how people made those totally awesome chalk art and had "chalked" (ha) it up to them being super artsy and talented. Not so my blogy friends! I found this lovely pin on Pinterest that totally changed the game. Then I found this awesome typography of a great Ferris Buller quote and knew we had a winner.


The first step was to print out what I wanted and take it to Staples. There they blew it up to poster size for about 20 bucks. I also loaded up on chalk.  Then I took it home and covered the back with chalk. And I mean cover it. The more the better. Next I taped it up on the wall with the chalk covered side facing the wall. 


I then found a ballpoint pen and started tracing all the lines. I was afraid resting my arm on the wall would also smudge some of the chalk on the wall making the outlines look messy, but that did not happen. Yay! This step took the longest as you really want to make sure you are pressing down and getting a good sharp line. 


I peeled up a corner to check on progress and was happy to see the outlines taking shape. 


After tracing over all the outlines I peeled the poster off to revel this. 


I then took my chalk and went to town filling in the lines and darkening some of the thinner lines. A good friend of mine told me to dunk the chalk in water before using to make it go on smoother. Worked like a charm. 


The thinner lines were a little stressful, but slow and steady wins the race. 


And done! 

Hope you all have a beyond wonderful Thanksgiving! xoxo 

Monday, November 25, 2013

Chalk Board Wall

Finally something big happened in the kitchen! We painted a GIANT chalk board wall. I've got pretty big plans for the kitchen and having something chalkboard was on that list. I originally thought a chalkboard refrigerator (see this for inspiration) would be ballin' but after realizing the fridge we inherited with the house needed to go we decided stainless steel was best for  home resale and function. Whew-whew.
So plan-b was put into action:


So this is what we started with. Kilzed empty blank bleh wall. 


The tools. I wanted to use the magnetic primer so the whole wall would be one big awesome functioning board. The magnetic paint ended up being quite the battle.  All the metal particles were in the bottom of the can which I did not realize until getting to the end of my first can and discovering a metal sludge. Woops. So one more can and 6 total coats of primer later.... it still doesn't work that great. It's magnetic but not enough to hold up anything. Also it made a HUGE mess and make the surface very bumpy. So I wouldn't recommend the primer. Save yourself the time.  


Yes, I paint in my football pants. Don't judge. 


The color of the chalk board paint. I was so afraid I had gotten blue. Luckily it dried nice and black like I wanted. 


What coat one of the magnetic primer looked like going on. I had such high hopes...


And the whole wall in all it's primer glory. Notice the blue tape and green countertop lip in the lower left corner. 


As I painted I started to think about that lip. It won't be there forever. Eventually we want to replace the countertops and add a subway tile backslpash. So I had 2 options. Leave it and have the hassle of fixing it and repainting that side and hoping it looked even down the road. Or take care of it now. Guess which one I chose. 


It was surprisingly easy to remove. I didn't even wake MLW up. However it did leave behind some nasty looking glue and an uneven surface. 


So out came the spackle and the sandpaper. 


Nice and even and pretty! No hassle down the road! A DYI win! 


The hardest part about the whole process was waiting the 3 days for the chalk paint to cure. Luckily it was over the weekend MLW and I were in Asheville so I didn't have to look at it for 3 days! 


After 3 days you have to set the paint by covering the whole surface in chalk. This makes it easier to erase down the line. 


It actually looked pretty cool all done, but it was dusty. Chalk dust particles were a flyin'! 


Look how messy my patched corner looks! I'm totally glad we did this before the new countertops.  Trying to keep the countertops clean and pretty during this whole process would have way upped the difficulty level.


I then took a rag and just erased all the chalk lines. Starting to look like a black board. That haze in the air is all the chalk particles. 


Dusty!


Dusty and gross. The magnetic primer made a huge mess. 


Viola! Add a fall garland that I rescued from a wedding. ( I can't stand to see good flowers go in the trash, especially if I have a hunch they will dry pretty) Also it still super hazy. It probably took a good 24 for all the dust to settle so I could clean it up. 


And the whole wall! The best part is waking up to sweet messages from my husband. Stay tuned for a tutorial on how to do chalk board art, because you know I didn't freehand that quote on the right! 

Friday, November 22, 2013

Small updates make me happy

Here's a few small updates I've made over the past few weeks. Just a couple of small tweaks that have made me super happy!


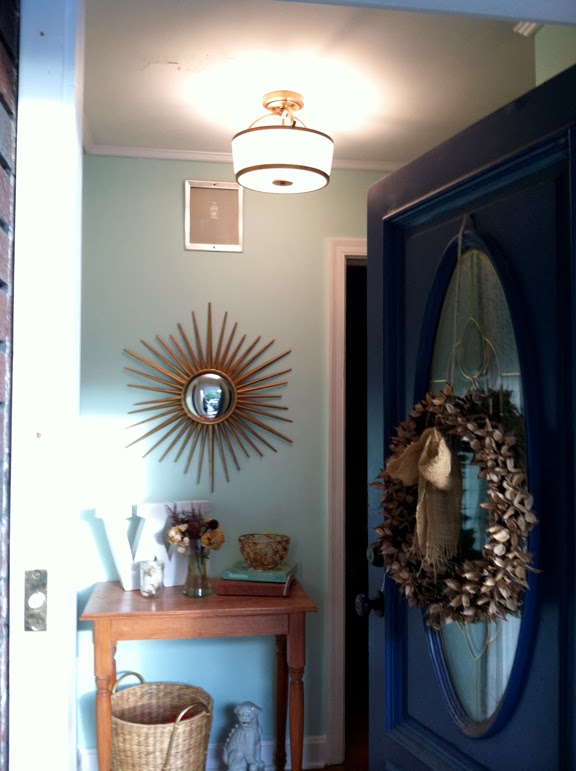
As promised here are some better (hopefully?) pictures of the hall lights. Aren't they pretty? It makes the whole hall feel fresher and new. Now if I could only get the art of the floors and onto the walls. 


And the lights are ready for their closeup. 


Coral towels and a fun little tray in the bathroom. I was a little afraid of the coral but now I'm totally digging it. The nice thing about the wallpaper is that it has so many color choices, I can easily switch up the accents depending on season or how I feel.


Hey Ya'll! Loving this super cute little entry sign by Stephanie Creekmur . Love the sign, love everything. 

Hope ya'll like all these little updates. Sometimes I have to take baby steps so the bigger projects don't overwhelm me. Its all in the details! 


Thursday, November 7, 2013

Birthdays and Brass Lights

I'm back! Sorry for the mini break last week, it was my birthday:D MLW and I also had a wedding in Asheville that was beautiful! We really loved getting to the mountains for a bit to see all the pretty colors.  And I got to bust out my fall/winter wardrobe. My OTK boots and Barbour coat made their official first outings of the season. Yay!
I did also get some pretty sweet birthday presents. Most of course are house related and I'm super excited to share some with you.


First up, these guys. My parents in law get me and I love it. Hippo salt and pepper shakers! MLW and I haven't had salt and pepper shakers  for the past few years ( our first set broke?) so I'm excited to have these little friends. 


Then MLW got me the wall light I've been lusting for the corner in the Den. Its perfect and adustable for my favorite cozy reading/pinterest-ing spot. We also have no other light sources other than the odd pendant ish lights in the middle of the room so it was definitely time to add some sort of lamp. I also plan on getting a floor lamp for by the door and eventually hanging these pendants from Urban up. 


This light is not a birthday present per say, but MLW helped me put it up during my birthday week (yes, we celebrate the whole week around here) so it counts? I purchased them a few weeks back and after my successful venture with the bath light we were ready to pop these bad boys up. Cue neck and back pain. But totally worth it. They look fab and say "Hey Ya'll, I'm an updated ranch!."  The color is a little hard to see but its a perfect antique brass. Most of the light fixtures in this house will probably end up being gold, brass or some variant of. Brass is back.


Remember this crazy, cattywompus light from before? Its gone and on its way to Goodwill.


This is the complimenting semi-flush light further down the hall. The picture is terrible. My apologies! As soon as I have a moment I'll bust out the Nikon and give better photos of both. But, trust me. They are pretty awesome in person. 

Thats all for now, but get ready for a feature wall I've been working on coming up on the blog soon!(Hint: its in the kitchen!)