Pages

Showing posts with label DIY. Show all posts

Wednesday, March 25, 2015

Tile

You watched, you waited, you got instagram sneak peaks, and now I present: the kitchen. 


What's up tile!?!


I'm obsessed with this pretty faucet and so glad we kept the original cast iron sink.


I took this little shot to give ya'll an idea of all the colors and how they play off each other.  I do need to touch up the paint on some of the cabinets after this. Tiling was by far the roughest we have been on the paint and marble.


So looking the other way, with a strategically placed corgi dog.


I guess I could have styled the side of the fridge up a little more. But who cares when the kitchen is so pretty.


I'm somewhat at a loss for words and truly can't believe it turned out as well as it did. We had my Dad over for dinner and Chefhusband whipped up something incredibly delicious.  Ernie is also thrilled with the results.


I also commissioned Flower Shop Charleston which is just around the corner to make a new garland for over the door and Lily did such a good job! She has an entire wall of dried flower crowns and I wanted to take them all home. If I could wear a flower crown everyday,  I would.

Next up, the porch!
Betsy

Tuesday, November 18, 2014

Bears and Adventures in Lucite Framing


I am so so so excited to share this piece of art. I've been wishin' and hoping for it for some time. The Animal Print Shop is basically the jam. The are all over Pinterest all be it mostly in the form of nursery art.

MLW and I have no babies, but we do have a pretty long running joke about bears. Basically I have an irrational fear of bears {Did you see Grizzly Man!?!}, also my spirit animal is a bear. Ironic right? We have a blank wall in the den above the TV = Perfect spot for a print of a bear!


The second part of this story is my desire to frame it up in acrylic like The Hunted Interior. Her step by step made it seem pretty easy. Framing can be pretty darn expensive so I wanted to give this DIY version a go.


Step 1, Acquire acrylic sheets from Lowe's. Lowe's will cut the sheets to whatever size you want fo free. Home Depot will not. I had mine trimmed to 24 x 30. My art is 16x 20.  I think the sheets where about $16 each.


Step 2, Order mounting hardware from this etsy shop. There is other hardware out there for cheaper but it is all stainless and I wanted brass. By this point ya'll should know how I feel about brass. Once you recive hardware, mark acrylic for holes.

Step 3, Animal Print Shop sends their prints with plenty of white space and I need this trimmed down. I was afraid to cut with scissors because I can not cut in a straight line to save my life. I also didn't want to buy a large format paper cutter because those babies are expensive. So I called a few stores to see if they offered paper cutting services. Here is what I learned, Michael's will not cut art at all. How they trim down things for framing I do not know. Office Depot has a large paper cutter you can use fo free or they will cut it for you for like $2. I did it myself but the man working was nice enough to help me. His wife's spirt animal is also a bear.


Step 4, Obtain a nail large enough to make a hole for the bolt to connect the frame to the wall. This turned out to be as little tricky. Only because the good folks at Lowe's couldn't figure out how much one large nail costs. 72¢.


Step 5, Wake up early on your day off and try to heat up said nail over a candle. Unlike other blogs who have attempted this, we don't have a gas range. So my heat sources where limited. After about 5 mins of roasting my nail over my measly candle, I realized that this would not work. {MLW proceeded to laugh at me all day for attempting this. And yes, I realize it is pretty silly, but I had to give it a whirl!}

Step 6, The Hunted Interior mentioned that a drill could also be used to create the necessary hole. Cool, I have a drill! So I attach my largest drill bit a 1/4" and drill away. Poof hole! Then I try to insert the bolt. Hole too small.

Step 7, I call my Dad to see if he has a drill bit large enough. Drive over to Dad's with acrylic sheets in tow.  He ended up having a bit of the right size but I completely cracked one of the sheets in the process. Major bummer.


Step 8, I mention that heating up a nail idea and out pops a propane torch. We heat up a screw safely attached to a pair of pliers so we don't burn our hands. It goes through and is the right size!!


Step 9, Dad sends me home with all the necessary tools and I hit up Lowe's to get a new sheet of acrylic.

*By this point I have been trying to hang up this blasted thing for about 5 hours.* 

Step 10, MLW and I proceed to torch a nail and make 8 holes in the acrylic.


Step 11, I used these awesome sticky strips for scrapbooking to attach the print to the acrylic.


Step 12, Then attach mounting hardware to wall as the instructions describe.

Step 13, Put the bolts through the holes and screw into mounted hardware.


Step 14, Step back and realize you spent an ENTIRE day hanging one photo.


But I really do love it, like big love. Also the bear needs a name. Huge kudos to the Animal Print Shop for the image and The Hunted Interior for the idea. I would also like to thank my hubs for buying the print for my birthday and to my Dad for supplying me with power tools and not laughing at my crazy ideas.

I need a beer.
Love,
Betsy


Monday, July 7, 2014

Kitchen Two and Three Fourths

True to form, the I'm giving you an update where the kitchen is almost done. I just get too excited and want to share!

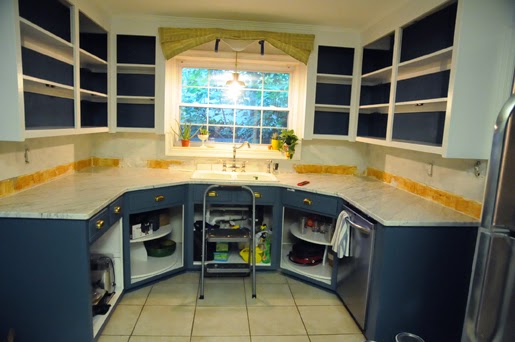
Side one and two -DONE! Side three? Lowers, done minus two doors {sounds familiar right?} Uppers- painted but missing doors.

Lets take a look around, shall we?


So I moved the rug back in while MLW was still asleep. I love it, jury is out on how he will feel. But doesn't it look so pretty!!!


Side 2 in all her tuxedo, and white and marble and butcher block majesty. My Dad came over and helped make the cut on the butcher block and we got it on the first try. Thank goodness the men in my life are good at math. 


Isn't she lovely? Isn't she wonderful? The added butcher block is a great work space. It is nice to have a countertop that we don't have to "baby" as much as the marble.


Ya'll have seen this side before, but look all the doors are on and closed. I had to go back and make some adjustments and add magnets to keep everything closed tight.


 We haven't seen the chalkboard wall in a wall so I wanted to give ya'll an image looking back that way too.


And finally the "egg" or side three. Lowers complete minus two doors. Uppers painted and patiently awaiting their glass fronts.

I can't wait to give ya'll one more post with all the doors done before we press on for tile {which might take us a while}.


Love,
Betsy

Friday, June 27, 2014

The Wavy Wonky Thing Over The Kitchen Sink

This post shall be known as TWWTOTKS, or the longest post title ever. I thought it was fitting, since I've recently had the longest blogging radio silence ever. My apologies.

But, back to TWWTOTKS. I fixed it! It was just a little too country for me. I'm more rustic, industrial, glam than country.

So here is how it all went down:


TWWTOTKS. No explanation needed.


Someone back in the day put a lot of craftsmanship into this and while I appreciate the work, its just not my style. 


First step was to hold up 2 pieces of wood to make sure the width would cover the side wonkyness. These are the exact trim pieces I'm using to add the shaker detail to the cabinet doors so there would be some consistency from top to bottom.


Next step was to measure the wood for the length I needed.


And then I brought in the in the big guns. Hello, nail gun and air compressor. Long time, no see? I wood glued these guys down as well for extra durability.


With both sides up, I step back to make sure they looked nice and even.


Fast forward a week later and we are done painting the LAST row of the upper cabinetry. This included the wood side pieces I added.


See that green thing being help up over the light? That is my "fauxman shade." Its a fake roman shade  and is literally fabric taped to a piece of wood and then folded, iron tapped and sewn together. Young House Love has a great tutorial here, I modified my folds a little bit to suit my needs.


See a piece of wood wrapped with fabric and clamped to the last bit of wavy wonkyness. I then measured, leveled,  drilled and....


Boom! It is square! And Modern! TWWTOTKS is gone! I am honestly a little shocked that this idea of mine worked, but it did.


Now if we can just get some cabinet doors back on, we will be ready to rock!


More updates soon!
Love,
Betsy

Monday, June 9, 2014

Kitchen Details

So the marble is in, and the cabinet painting is on, and I've got a few new details {including the kitchen sink} to share.


We had to have William come back out and patch some of the drywall, but MLW handled most of the instal of the new faucet. We own a bridge faucet!!!!! I'm overwhelmingly excited. I found it on Amazon for around $130 including the sprayer. Insane. The sink just needed a little scrubbing from where the old faucet was and it was ready to go.

I had debated about a brass faucet, but in the end decided I wanted to keep the mixed metal theme going. We have a lot of brass accents in the hardware and lighting, so the stainless faucet keeps everything even.


A photo to give you a little scale of the sink compared to the overhead light.


So far I'm l o v i n g it. MLW's only complaint is that the sprayer head is heavy, but I like the added weight.


I found some brass side accents that fancy up {is that a term?} the sink necessities. A brass towel holder from Wayfair, a soap dispenser from Anthro and a sponge holder from Target.

Do you see that subway tile peeking out in the background? I bought a few tiles from Lowes just to start getting an idea for pattern and to confirm that is what we wanted to do.


We have also painted the lower boxes and drawers, but I'm having to hold off on construction of the doors. My Papa Bear is out of town and I need his assistance for some of the longer cuts necessary to finish theses off.


I am absolutely in love with how the marble and the slate blue play off each other. Its perfect.

1 more round of door making, painting the last section of the uppers and we are ready to start tiling! One challenge at a time...

xoxo,
Betsy

Thursday, May 8, 2014

The white side

Another kitchen post. We are getting there slowly but surely. I hired a handyman to come help finish off a few things and he was well worth it! Several items checked off my list in a handful of hours = well worth it. William the handyman was great and if any of you Chuck readers need his number, I'll hook you up! 


So happy to see this little guy. I don't know how William did it, but this is muchhh better than the gaping hole of florescent light that was up there. 


More importantly it let me hang my over the sink light that several of you helped me pick via facebook and instagram! Option 2 was our winner and I'm glad I agreed with most of you. The light came from Cedar and Moss. Check them out, they have several really pretty fixtures  I would love to hang from my ceilings! {or walls }


Here is the view looking straight down with both light fixtures installed. A little hard to see here since the kitchen is so massive, but they look super chic paired together.


 But back to the main focus of this story; the cabinets MLW's granddad built for us! William added some trim at the bottom to finish them off and a spacer so they were a little closer to the stove. {I kept dropping things down there}


My first step was to caulk the insides and any seams so everything would have a smooth finish. Also, trash bags are my floor coverings of choice.


Hey Kilz, I missed you! NOT.


I hate painting with this stuff, but it works. 2 coats of high fume super sticky paint later and I was ready to move on to the uppers. Priming is necessary step. {blerg}


Had to tape off my new pretty vent hood, but then I was able to get to painting the insides . These cabinets were gross!


I know its a little hard to tell, but the  upper shelf is the old color, and the lower the new. See how yellow and nasty the old paint looked? Yuck!


But then came 2 coats of my BM Decorators white, and a little dressing up with hardware!


This did happen though. I measured everything and marked it as I had all the lowers on the opposite side, but as soon as I drilled the hole I knew I'd made a massive mistake. I called MLW in for a second opinion and he looked at it and said "you're going to fix that right?" It honestly looked ridiculous. So I marked the middle of the panel and installed a knob there with much more successes.


Luckily it was an easy fix, with just a little bit of wood filler and more paint. Now all the hardware is ready to rock!


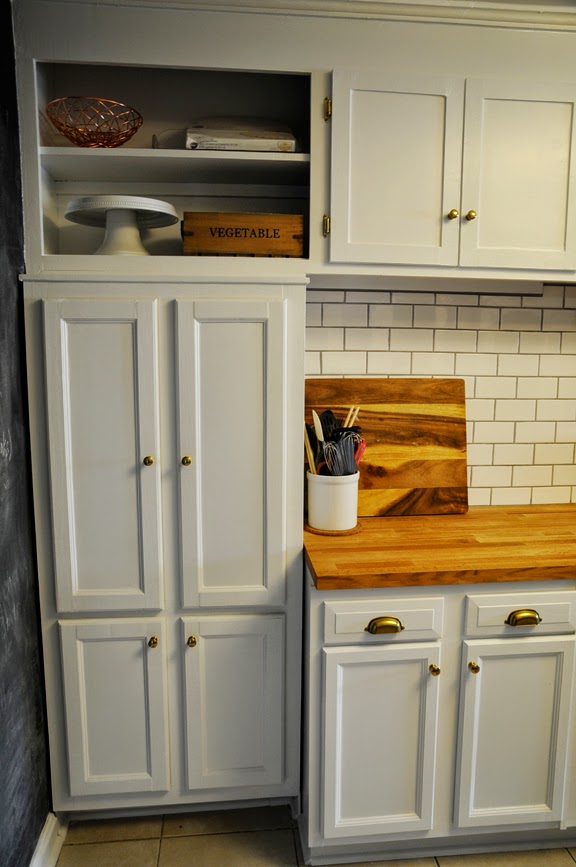
Don't get too excited, this is just our cutting board that I strategically photographed. But, we do have a butcher block piece on order to top this off. The door styling is just a little different than what we could recreated with our DIY shaker doors. So we are going to celebrate the difference and make it a feature in the kitchen. Also having a piece of butcher block will help with food prep and keeping the marble etch and stain free!

I can't wait to show ya'll once the countertop comes in and I finish everything on the uppers.

Love,
Betsy